In this post, we will teach you how to use the Pleasepoint SDK for one-to-one product recommendations using JavaScript. This way, you can use the SDK functions at any point of user interaction.
Here are the contents of the post:
- SDK JS: Improve your customers' experience.
- Adding the Pleasepoint SDK in the JS scripts loaded by the page.
- One-to-one product recommendations.
- Product recommendations based on another product (item-item).
- Product recommendations based on ranking (ranking one-to-one).
- Recommendations based on bestsellers.
- Recording interaction events.
- Why should you personalize your eCommerce one-to-one with the HTML SDK?
This post is the third in a series of four posts on how to use the Pleasepoint SDK. In this article, we will cover the use of the SDK in JavaScript. We share the links to the other three posts:
- The Pleasepoint SDK: One-to-one and real-time personalization of eCommerce interactions.
- SDK HTML: Implement one-to-one recommendations using HTML tags.
- API: Implement one-to-one recommendations by directly accessing the API.
SDK JS: Hyper-personalize user experiences in real-time.
To maximize sales and customer satisfaction in your eCommerce, you cannot rely solely on a "one size fits all" strategy. Every customer is unique, and treating them personally will make the difference.

With the Pleasepoint JS SDK, you manage the use of recommendations and event tracking in your JS code. We recommend using the JS version when all the necessary information is available on the frontend to display recommendations and record interaction events. Events like adding to the cart are likely to always be handled via JS.
If you are not familiar with the Pleasepoint SDK, we recommend reading this introductory post first.
Below, we show the JS code to display recommendations and record events.
1. Adding the Pleasepoint SDK in the JS scripts loaded by the page.
This is the script you need to add before the closing body tag in your eCommerce. You need to embed this script on every page.
<script type="module" src="https://platform.pleasepoint.com/pleasepoint-widgets/index.js"></script>2. Displaying one-to-one product recommendations.
Here are the links on how to use one-to-one product recommendations:
- Using the default parameters of the one-to-one product recommendation widget.
- Using the specific parameters of the one-to-one product recommendation widget.
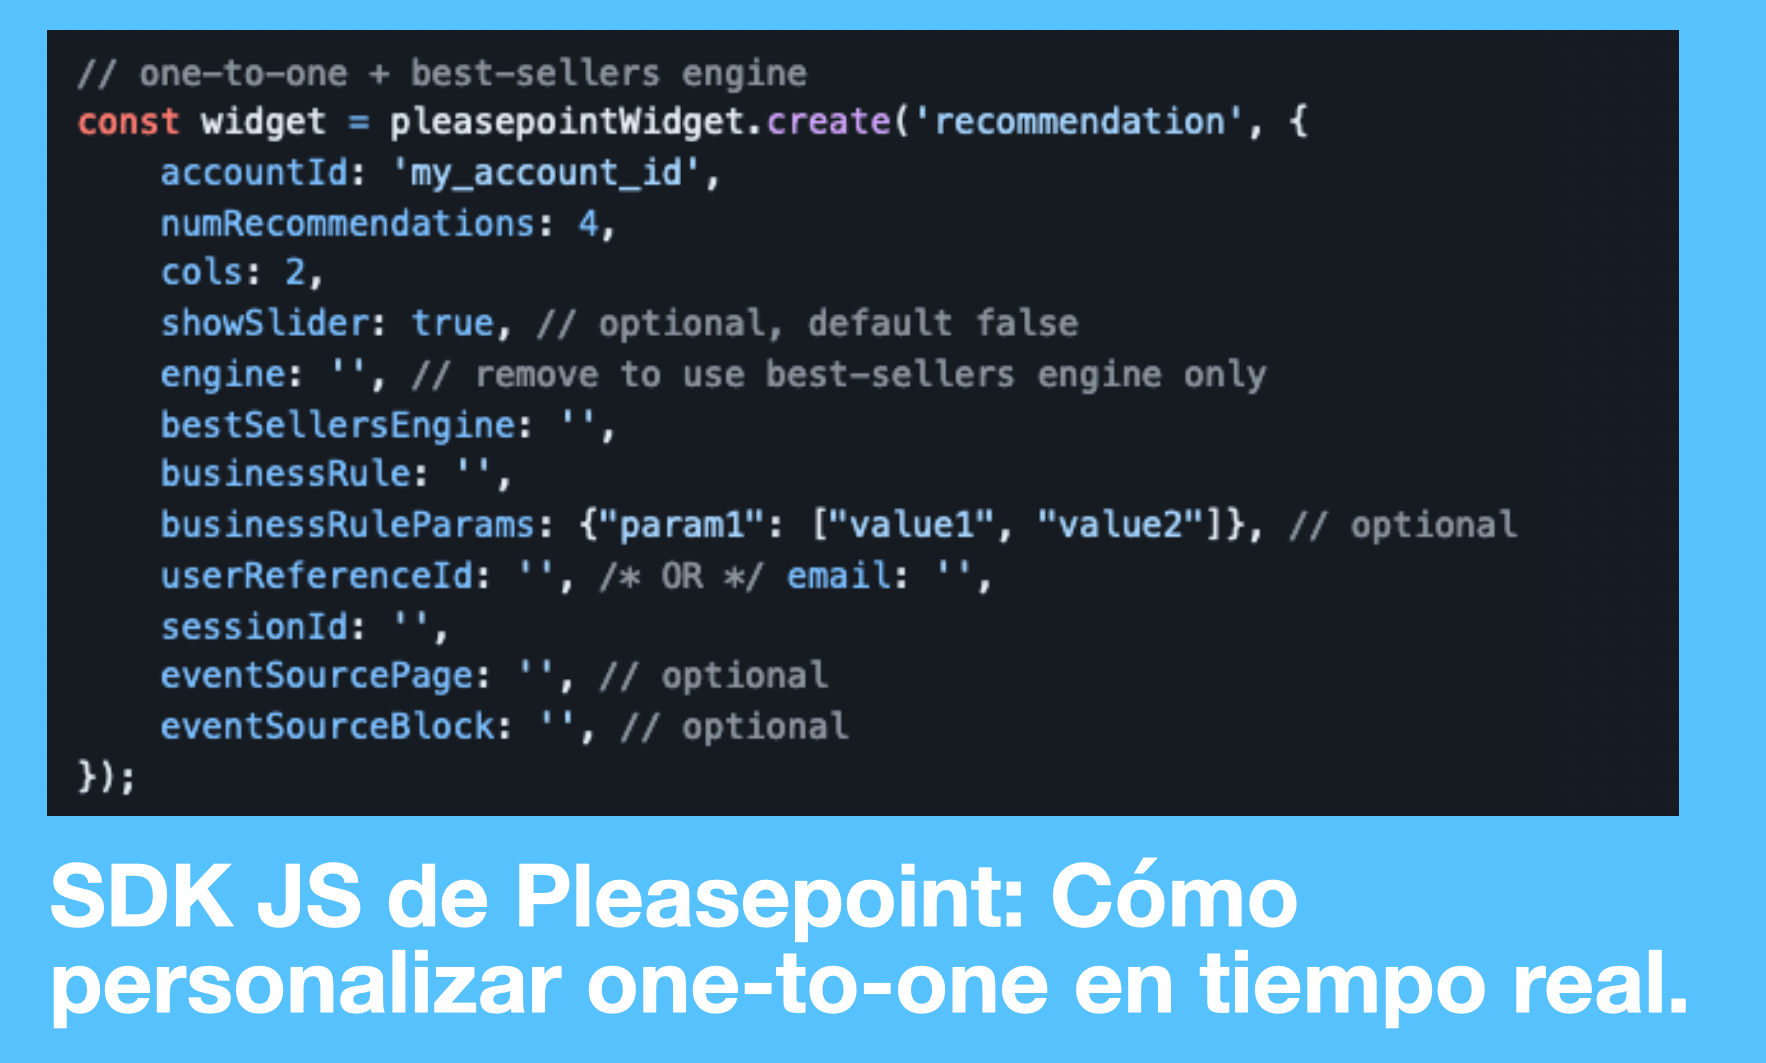
This is the JS code to display one-to-one product recommendations.
const widget = pleasepointWidget.create('recommendation', {
    accountId: 'my_account_id',
    numRecommendations: 4,
    cols: 2,
    showSlider: true, // optional, default false
    engine: '', // remove to use best-sellers engine only
    bestSellersEngine: '',
    businessRule: '',
    businessRuleParams: {"param1": ["value1", "value2"]}, // optional
    userReferenceId: '', /* OR */ email: '',
    sessionId: '',
    eventSourcePage: '',
    eventSourceBlock: '' // optional
});

// insert widget into page
document.body.appendChild(widget);
Remember to adjust the parameters according to your Pleasepoint account, the widget configuration, and the user and session identification.
3. Displaying product recommendations based on another product (item-item).
Here are the links on how to use item-item product recommendations:
- Using the default parameters of the item-item product recommendation widget.
- Using the specific parameters of the item-item product recommendation widget.
This is the JS code to display item-item recommendations.
const widget = pleasepointWidget.create('recommendation', {
    accountId: 'my_account_id',
    numRecommendations: 4,
    cols: 2,
    showSlider: true, // optional, default false
    itemItemEngine: '',
    businessRule: '',
    businessRuleParams: {"param1": ["value1", "value2"]}, // optional
    products: ['product_reference_id1', 'product_reference_id2', ...],
    userReferenceId: '', /* OR */ email: '', // both optional
    sessionId: '',
    eventSourcePage: '',
    eventSourceBlock: '' // optional
});

// insert widget into page
document.body.appendChild(widget);
Remember to adjust the parameters according to your Pleasepoint account, the widget configuration, and the product, user, and session identification.
4. Displaying the one-to-one ranking.
Here are the links on how to use one-to-one product ranking recommendations:
- Using the default parameters of the one-to-one product ranking recommendation widget.
- Using the specific parameters of the one-to-one product ranking recommendation widget.
This is the JS code to display one-to-one ranking recommendations.
const widget = pleasepointWidget.create('recommendation', {
    accountId: 'my_account_id',
    numRecommendations: 4,
    cols: 2,
    showSlider: true, // optional, default false
    rankingEngine: '',
    businessRule: '',
    businessRuleParams: {"param1": ["value1", "value2"]}, // optional
    userReferenceId: '', /* OR */ email: '',
    sessionId: '',
    productList: 'prod1,prod2',
    eventSourcePage: '',
    eventSourceBlock: '' // optional
});

// insert widget into page
document.body.appendChild(widget);
Remember to adjust the parameters according to your Pleasepoint account, the widget configuration, and the user and session identification.
5. Displaying bestseller recommendations.
Here are the links on how to use product recommendations based on bestsellers:
- Using the default parameters of the bestseller product recommendation widget.
- Using the specific parameters of the bestseller product recommendation widget.
This is the JS code to display bestseller recommendations.
const widget = pleasepointWidget.create('recommendation', {
    accountId: 'my_account_id',
    numRecommendations: 4,
    cols: 2,
    showSlider: true, // optional, default false
    bestSellersEngine: '',
    businessRule: '',
    businessRuleParams: {"param1": ["value1", "value2"]}, // optional
    userReferenceId: '', /* OR */ email: '',
    sessionId: '',
    eventSourcePage: '',
    eventSourceBlock: '' // optional
});

// insert widget into page
document.body.appendChild(widget);
Remember to adjust the parameters according to your Pleasepoint account, the widget configuration, and the user and session identification.
6. Recording interaction events.
Here is the link to see the description of the parameters for recording interaction events.
This is the HTML code you need to embed to record interaction events.
pleasepointWidget.registerEvent({
    accountId: 'my_account_id',
    apiId: 'my_tracking_id',
    products: ['product_reference_id1', 'product_reference_id2', ...],
    userReferenceId: '', /* OR */ email: '',
    sessionId: '',
    eventType: 'impression' | 'click' | 'add_to_cart' | 'purchase',
    source: '',
    recommendationId: 'recommendation_id' | null,
});
Remember to adjust the parameters according to your Pleasepoint account, the user identification, session, products being interacted with, and the type of event.
Why should you personalize your eCommerce one-to-one with the JS SDK?
The Pleasepoint JS SDK is very useful when you have logic on the client side. To use the JS SDK, you need access to the following information:
- User ID or email and session ID.
- IDs of the products the user is viewing or interacting with.
Tracking Add to Cart events is one of the classic uses of this SDK.
Download our eBook Introduction to One-to-One Marketing and learn how to execute a hyper-personalized strategy based on the lifecycle and preferences of each of your customers. It has never been easier to start hyper-personalizing and increasing the performance of your marketing actions.