
Technical guide to one-to-one personalization in your eCommerce with the Pleasepoint SDK.
Discover how to implement the Pleasepoint SDK in your eCommerce for real-time one-to-one personalization. This technical guide provides a step-by-step approach to customizing the customer experience and boosting conversions.
The Pleasepoint JS SDK is the essential tool for developers to customize real-time one-to-one user experiences in eCommerce. With the SDK, you'll gain real-time access to the machine learning and deep learning models deployed on the Pleasepoint platform. These models are meticulously trained to adapt the user experience based on their preferences and consumption patterns while they browse the website.
One of the key features of the Pleasepoint JS SDK is its ability to log user interaction events during browsing. By capturing these interaction events, you'll provide valuable context to the neural network, enabling it to analyze and understand user behavior before a purchase is made.
Effectively capturing and processing these events significantly enhances personalization capabilities, resulting in a more relevant and satisfying experience for the user and improving conversion rates.
It is crucial to fully understand how to implement and maximize the SDK's capabilities. For this reason, we've prepared a comprehensive guide covering all technical and functional aspects of the SDK. If you're interested in exploring the Pleasepoint SDK, here is the documentation.
Here is the content of the post:
- Installing the SDK.
- Introduction to event logging.
- Defining event types.
- Logging events by page on the site.
- Displaying one-to-one real-time recommendations.
- A/B testing implementation.
If you want to dive deeper into using the Pleasepoint SDK, we recommend the following posts:
- The Pleasepoint SDK: Personalize one-to-one and real-time interaction in eCommerce.
- JS SDK: Implement one-to-one recommendation using JavaScript.
- HTML SDK: Implement one-to-one recommendation with HTML tags.
- API: Implement one-to-one recommendation by directly accessing the API.
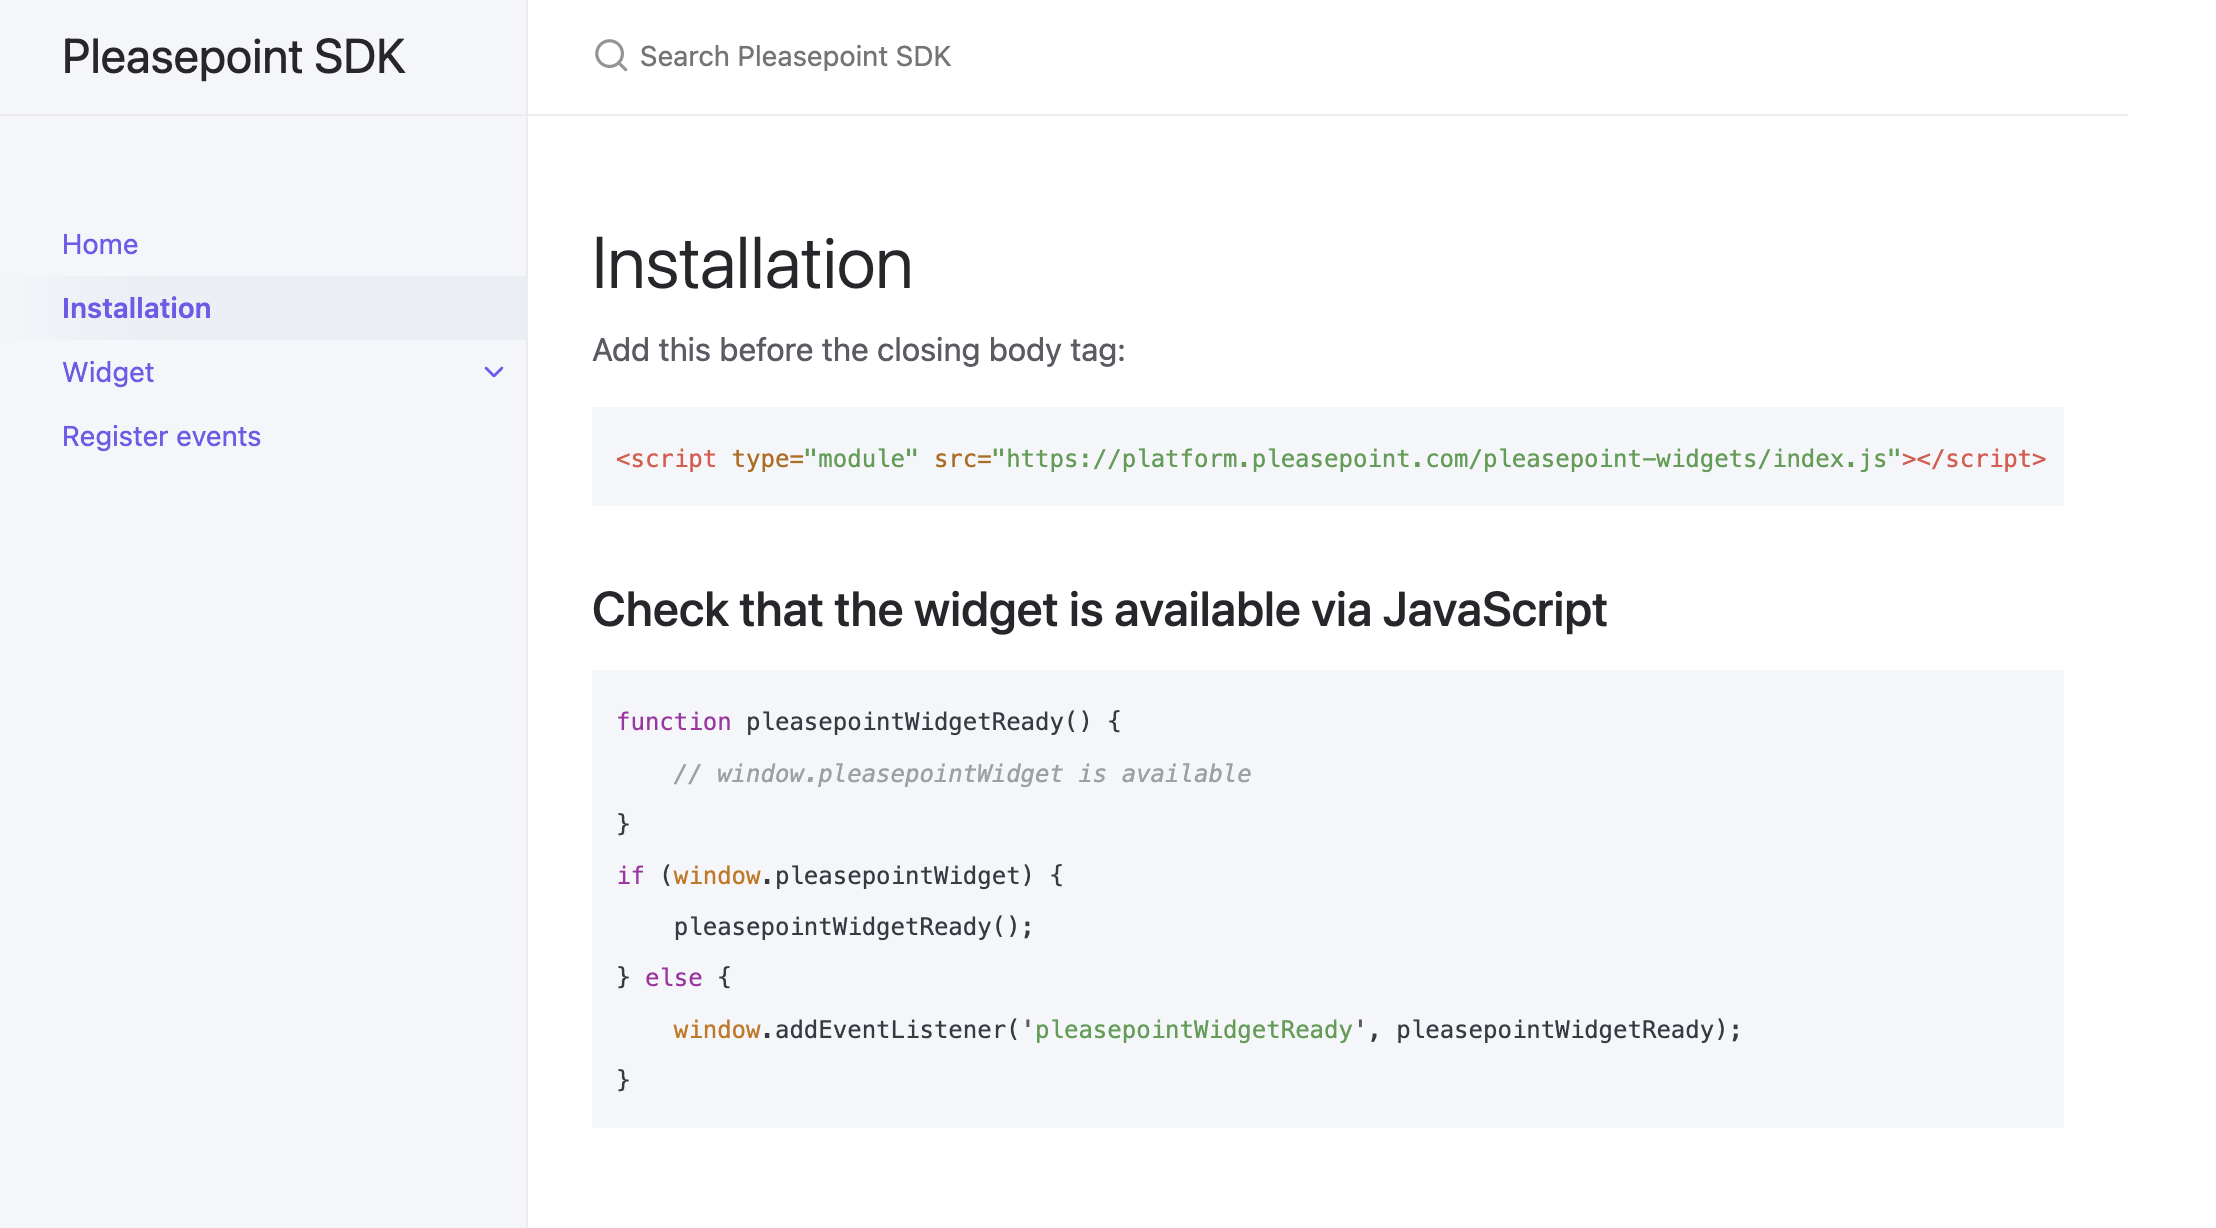
1. Installing the SDK.
Here is the script you need to add before the closing body tag of your eCommerce site. This script should be embedded on all pages.
<script type="module" src="https://platform.pleasepoint.com/pleasepoint-widgets/index.js"></script>Here’s how you can verify that the Pleasepoint SDK is available via JavaScript:
function pleasepointWidgetReady() {
    // window.pleasepointWidget is available
}
if (window.pleasepointWidget) {
    pleasepointWidgetReady();
} else {
    window.addEventListener('pleasepointWidgetReady', pleasepointWidgetReady);
}
2. Introduction to event logging.
It's crucial to properly log events generated on the page to accurately measure the performance of our recommendation engines. It's important to note:
- Event logging always requires a product reference, which is key to both the engine and the events.
- To measure performance accurately, page-level events (external to the SDK, such as product impressions, product listings, or add-to-cart events) must be logged, as the SDK already logs native events.
An event registration call looks like this:
pleasepointWidget.registerEvent({
	accountId: 'XXXXXXXXXXXXX',
	apiId: 'XXXXXXXX-XXXX-XXXX-XXXX-XXXXXXXXXXXX',
	products: [id_product1, id_product2],
	userReferenceId: 'user_id', /* OR */ email: 'user@email',
	sessionId: id_session,
	eventType: 'impression' | 'click' | 'add_to_cart' | 'pdp' | 'checkout' | 'execute_checkout' ,
	source: {
		page: '',
		block: ''
	}
});
The function takes the following parameters:
- AccountId and apiId: Identifiers for the Pleasepoint Platform environment and event API.
- Products: Array of product identifiers.
- UserReferenceId or email: User identifier or email (when the user is logged in, otherwise pass a null value).
- SessionId: Session ID associated with the user's visit, generated by the application when the user first accesses the website. You can also use PHPSESSID (for PHP websites) or the _ga cookie on sites with Google Analytics enabled.
- EventType: Event type. Permitted values are: impression, click, plp, pdp, add_to_cart, checkout, execute_checkout.
- Source: The origin of the event, an object with 2 keys:
- Page: The page where the event originated, e.g., home, pdp (Product Detail Page), plp (Product Listing Page), cart.
- Block: The block where the event was generated, free text. It’s optional, but can be used to better distinguish the event’s origin within the same page. For example, on the Home page, you could have multiple blocks: offers, bestsellers, don't forget, featured_books, etc.
3. Defining event types.
In real-time eCommerce personalization, understanding user behavior and interactions is crucial for deep learning models to offer increasingly relevant content. To achieve this, it's essential to log events that provide a complete context of user interactions before making an online purchase.
The most relevant events to log include product impressions, product clicks, product page views, adding a product to the cart, initiating checkout, and completing a purchase. Each of these events provides valuable information about how users interact with your eCommerce site, from first contact to final conversion.
Event "Impression".
eventType: impression- Definition: These are views of product-type items on any page and product listings in the eCommerce.
- When to log it?: Every product displayed in a product listing should be accompanied by an impression event. It’s not necessary to log events one by one; they can be done in blocks in a single request.
- Important parameters: It is recommended to fill in the source's page parameter to distinguish where the product impressions come from.
Event "Product click".
eventType: click- Definition: Logs a user clicking on a product link that directs them to the specific product page.
- When to log it?: On every product link (image, name, etc.) that redirects the user to the product page.
- Important parameters: It is recommended to fill in the source's page parameter to distinguish where the product impressions come from.
Event "Product page view".
eventType: pdp- Definition: Indicates when a specific product page is viewed.
- When to log it?: A pdp event should be logged for every product page opened by the user.
- Important parameters: It will contain a single product reference, the one from the viewed page.
Event "Add to cart".
eventType: add_to_cart- Definition: Logs the action of adding a product to the shopping cart.
- When to log it?: On any link in the eCommerce that adds a product to the shopping cart. This can be centralized in the add-to-cart function if it’s common to all pages.
- Important parameters: In this case, the page and block parameters can be combined to pinpoint the event's exact origin.
Event "Checkout initiation".
eventType: checkout- Definition: Informs the system that the checkout process has started.
- When to log it?: A checkout event should be logged whenever the checkout process starts, containing the products that were added to the cart beforehand. It can be implemented in the function that leads to the payment process from the cart.
Event "Purchase completion".
eventType: execute_checkout- Definition: Informs the system that the purchase has been successfully processed and a receipt has been generated.
- When to log it?: After the payment is completed, the event should be logged with the list of purchased products. It can be implemented on the order confirmation page.
4. Logging events by page on the site.
It's essential to identify and log the typical events that occur on each key page of an eCommerce site. These include the homepage, product listing pages, product detail pages, the shopping cart, and the order confirmation page.
This guide explains the most relevant events to log on each of these pages, highlighting their importance and how they provide valuable information for improving the user experience and optimizing the one-to-one personalization performance of your eCommerce.
You can access the full documentation on the event logging function here.
Here is the summary table of events by page:
| Impression | Product click | PDP visit | Add to cart | Checkout initiation | Order confirmation | |
|---|---|---|---|---|---|---|
| Home | Yes | Yes | No | Yes | No | No |
| Product Listing Pages (PLPs) | Yes | Yes | No | Yes | No | No |
| Product Detail Pages (PDPs) | Yes | Yes | Yes | Yes | No | No |
| Cart Pages | Yes | Yes | No | Yes | Yes | No |
| Order Confirmation | No | No | No | No | No | Yes |
Remember that only events external to the recommendation SDK should be logged, as the SDK handles its own events internally.
Logging events on the homepage.
On the eCommerce homepage, we should log:
- Impression: Impressions of each product displayed.
- Click: Any product clicks.
- Add to cart: If the design includes an add-to-cart button for the product from the listing without going to its product page.
Here is the structure of the JavaScript function call for logging events on the homepage using the Pleasepoint SDK.
pleasepointWidget.registerEvent({
	accountId: 'XXXXXXXXXXXXX',
	apiId: 'XXXXXXXX-XXXX-XXXX-XXXX-XXXXXXXXXXXX',
	products: [id_product1, id_product2],
	userReferenceId: 'user_id', /* OR */ email: 'user@email',
	sessionId: id_session,
	eventType: 'impression' | 'click' | 'add_to_cart',
	source: {
		page: 'home',
		block: 'XXXX'
	}
});
The block parameter in the source section is optional but can be used to better distinguish the event's origin within the same page.
Logging events on product listing pages (PLPs).
On product listing pages, you should log the same events as on the homepage, as they are generally very similar.
- Impression: Impressions of each product displayed.
- Click: Any product clicks.
- Add to cart: If the design includes an add-to-cart button for the product from the listing without going to its product page.
Here is the structure of the JavaScript function call for logging events on PLPs using the Pleasepoint SDK.
pleasepointWidget.registerEvent({
	accountId: 'XXXXXXXXXXXXX',
	apiId: 'XXXXXXXX-XXXX-XXXX-XXXX-XXXXXXXXXXXX',
	products: [id_product1, id_product2],
	userReferenceId: 'user_id', /* OR */ email: 'user@email',
	sessionId: id_session,
	eventType: 'impression' | 'click' | 'add_to_cart',
	source: {
		page: 'plp',
		block: 'XXXX'
	}
});
Logging events on product detail pages (PDPs).
Accessing a product page is an important event in the shopping experience on an eCommerce site. On each product page, you should log the following events:
- PDP: This is the event for the product on the page being viewed.
- Impression: Impressions of other products displayed if there is a related products block or similar.
- Click: If other products are shown on the page, any clicks on them should be logged with the click event.
- Add to cart: When clicking on the add-to-cart button on the product page. If other products are displayed and the design includes an add-to-cart button for them from the listing without going to their product page.
Here is the structure of the JavaScript function call for logging events on PDPs using the Pleasepoint SDK.
pleasepointWidget.registerEvent({
	accountId: 'XXXXXXXXXXXXX',
	apiId: 'XXXXXXXX-XXXX-XXXX-XXXX-XXXXXXXXXXXX',
	products: [id_product1, id_product2],
	userReferenceId: 'user_id', /* OR */ email: 'user@email',
	sessionId: id_session,
	eventType: 'pdp' | 'impression' | 'click' | 'add_to_cart',
	source: {
		page: 'pdp',
		block: 'XXXX'
	}
});
Logging events in the shopping cart.
On the shopping cart page, the following events should be implemented:
- Impression: If other products are displayed besides those in the cart, log impressions of each product shown.
- Click: Any clicks on a product that is not in the cart.
- Add to cart: If other products can be added to the cart directly from the cart page, log this event when they are added.
- Checkout initiation: Log a checkout event when the "Proceed to checkout" button is clicked, typically just before the payment gateway. This event should include all products in the cart. The source parameter does not need to be filled in for this event.
Here is the structure of the JavaScript function call for logging events on PDPs using the Pleasepoint SDK.
pleasepointWidget.registerEvent({
	accountId: 'XXXXXXXXXXXXX',
	apiId: 'XXXXXXXX-XXXX-XXXX-XXXX-XXXXXXXXXXXX',
	products: [id_product1, id_product2],
	userReferenceId: 'user_id', /* OR */ email: 'user@email',
	sessionId: id_session,
	eventType: 'impression' | 'click' | 'add_to_cart' | 'checkout',
	source: {
		page: 'cart',
		block: 'XXXX'
	}
});
Logging events on the order confirmation page.
Once the payment is completed and the order is confirmed, this event should be logged on the order confirmation page.
- Order confirmation: This event logs all purchased products.
Here is the structure of the JavaScript function call for logging the order confirmation event using the Pleasepoint SDK.
pleasepointWidget.registerEvent({
	accountId: 'XXXXXXXXXXXXX',
	apiId: 'XXXXXXXX-XXXX-XXXX-XXXX-XXXXXXXXXXXX',
	products: [id_product1, id_product2],
	userReferenceId: 'user_id', /* OR */ email: 'user@email',
	sessionId: id_session,
	eventType: 'execute_checkout',
	source: {
		page: '',
		block: ''
	}
});
5. Displaying one-to-one real-time recommendations.
Now it's time to see how to insert personalized one-to-one recommendations into any space on the eCommerce site using the Pleasepoint SDK. Interaction events with the recommendation widget are completely transparent to the user and logged automatically.
You can access the full documentation here.
The Pleasepoint widget is a web component that can be incorporated into your website or eCommerce to display personalized recommendations. It can be inserted via HTML or JavaScript. HTML attributes are in kebab-case, while JavaScript uses camelCase.
This is the basic structure of the widget:
Usage in HTML:
<pleasepoint-recommendation
    account-id="my_account_id"
    num-recommendations="4"
    cols="2"
    show-slider <!-- optional, default false -->
    <!-- engine-specific attributes -->
    business-rule=""
    business-rule-params='{"param1": ["value1", "value2"]}' <!-- optional -->
    user-reference-id="" <!-- OR --> email=""
    session-id=""
    event-source-page="" <!-- optional -->
    event-source-block="" <!-- optional -->
></pleasepoint-recommendation>
Usage in JS:
const widget = pleasepointWidget.create('recommendation', {
    accountId: 'my_account_id',
    numRecommendations: 4,
    cols: 2,
    showSlider: true, // optional, default false
    // engine-specific attributes
    businessRule: '',
    businessRuleParams: {"param1": ["value1", "value2"]}, // optional
    userReferenceId: '', /* OR */ email: '',
    sessionId: '',
    eventSourcePage: '', // optional
    eventSourceBlock: '', // optional
});

// widget is a regular HTML element, insert it into the page as usual
// for example:
document.body.appendChild(widget);
Here are the main parameters for the widget:
- Account id: Identifier for your Pleasepoint account.
- Num. recommendations: The number of recommendations provided by the recommendation neural network.
- Cols: The number of columns to display the recommendation in.
- Show slider: Optional field; if enabled, all products will be displayed in a single row with a slider to scroll through and view all the products. Otherwise, the recommendations will be displayed in the required number of rows based on the number of recommendations and columns.
- Engine: The one-to-one recommendation engine. This parameter varies depending on the recommendation model you want to use.
- Bestsellers engine: The recommendation engine for bestsellers. This engine is used as an alternative recommendation if the desired one-to-one recommendation is unavailable.
- Business rule: Business rule to apply to the recommendation. With the business rule, we bring the commercial strategy to personalization.
- Business rule params: Dynamic parameters for the business rule. To hyper-personalize the experience, we recommend connecting CLV and buyer-persona models with the business rule parameters. These act as variables for the established business rule.
- Secondary business rule: Alternative business rule. When a secondary rule is defined, it is used if the desired one-to-one recommendation is unavailable. If not defined, the same business rule as the primary rule is used.
- Secondary business rule params: Dynamic parameters for the secondary business rule.
- User reference id: User identifier when logged in. This field is unnecessary if we have the user's email.
- User email: User email when logged in. This field is unnecessary if we have the user's ID.
- Session id: Session ID of the user. This identifier is only used for event logging; Pleasepoint does not add any cookies to identify the user over time.
- Event source page: Value that identifies the type of page where the recommendation is displayed.
- Event source block: Value that identifies the block of the page where the recommendation is displayed.
In the documentation, you’ll find complete information on parameters for one-to-one or bestsellers recommendations, item-item recommendations, and one-to-one rankings.
6. A/B testing implementation.
To enable A/B testing in the Pleasepoint widget, include the parameter indicating the percentage of sessions you want to classify as B during the test. This way, each user session is classified as either A or B at the start of their session and receives the entire experience based on the defined case.
This is how you should load the script to activate A/B testing:
<script type="module" src="https://platform.pleasepoint.com/pleasepoint-widgets/index.js" pleasepoint-ab-test-percent="5"></script>In this example, 95% of user sessions will be classified to see personalized product recommendations, while the remaining 5% will see the products selected for case B.
Using default products.
One option for A/B testing is to have case B show default products manually selected or chosen by the eCommerce system.
To activate this functionality, add the default products parameter to the test with this parameter:
<!-- HTML -->
ab-test-default-products="['prod1','prod2']"
// JS
abTestDefaultProducts: ['prod1','prod2']Using bestsellers recommendation.
A good practice is to run A/B testing using the bestsellers model for recommendation. This way, you measure the impact of personalizing the experience versus showing the top-selling products at any given moment.
To use this recommendation model in A/B testing, follow these steps:
- Ensure you don’t include the default products parameter.
- Ensure you’ve included the
best-sellers-engineparameter in the configuration options.
Using Pleasepoint SDK’s A/B testing functionality allows you to quickly activate the experiments you need without additional tools.
If you already have an A/B testing tool, you can use the Pleasepoint SDK from within the test tool you’ve deployed without needing to use this functionality.
Feel free to contact our support team if you have any questions about implementing one-to-one personalization.
También te puede interesar...

AWS Summit Madrid 2025: MyOutfits Launch
Pleasepoint and Morillas present the official launch of MyOutfits at AWS Summit Madrid 2025.

Ecommerce in Verdiblanco: One-to-One Recommendation (AI).
The goal is to offer a unique experience to fans at every touchpoint.

Success Story: AI Agent for Atelier Libros.
Success story of Atelier Libros: How to offer an efficient and personalized experience in its digital library.
Don't miss the upcoming Pleasepoint events!
Join our events and discover the best AI use cases. Learn from experts, participate in live demos, and access success stories that will drive your business.

Amazon Web Services (AWS) Software Partners (ISV).
We are ISV (Independent Software Vendor) partners of Amazon Web Services (AWS) and have been selected for the ISV-Accelerate program.


"With Pleasepoint, we have moved from the traditional campaign management model to a more dynamic, segmented, and enriched customer model, personalizing CRM campaigns and improving the conversion of our e-commerce channel customers."
Josep Jarque
Digital Project Manager & IT Architect"The implementation of one-to-one personalization has allowed us to generate much more interesting content for users, as well as foster loyalty, improve the shopping experience, and generate additional sales through personalized recommendations."
Jose Antonio Linde
COO of Condisline"Throughout all these years of collaboration, we have closely witnessed the growth and evolution of the Pleasepoint platform. With predictive marketing, our results were very satisfactory. With one-to-one personalization, we have been able to enrich the information and design individual actions and offers. As a result, we are achieving greater customer retention and loyalty."
Alberto Elizondo
Digital Transformation at Real Sociedad"Working with Pleasepoint allows us to discover new customer purchasing behaviors, refine the implementation of campaigns based on their shopping journeys, and anticipate customer needs. Thanks to all this, we are improving personalization and enhancing the performance of our campaigns."
Belén Pérez Benavente
Customer Knowledge and Loyalty Manager at Norauto Spain"Pleasepoint has enabled us to take a leap in the analysis and segmentation of our customer base. Thanks to its personalization and predictive capabilities, we can now design more precise and efficient CRM campaigns based on purchasing behavior, optimizing our results, allowing us to innovate and add value."
Manuel Caamaño De Melo
Data Scientist at Norauto Spain"Thanks to Pleasepoint, our digital library is not only more intuitive and efficient, but also allows users to access relevant legal content with unparalleled speed and precision. This has transformed the way our clients interact with legal resources, offering a service that adapts to their needs almost naturally."
Òscar Gallud
CEO of Atelier LibrosOur clients vouch for us.


